How Do You Stop Sheet Metal from Warping During Welding?
How Do You Stop Sheet Metal from Warping During Welding?

Have you ever finished a perfect weld only to watch your carefully aligned sheet metal twist into a potato chip? You're not alone. Welding distortion haunts fabricators across every industry, from automotive manufacturers to custom industrial machinery builders. The good news is that warping isn't inevitable. With the right techniques, you can keep your panels flat and your projects on track.
Quick Answer: Stop Warping in 5 Steps
Here's what actually works to prevent sheet metal warping welding:
- Start smart: Use a center-to-edges tack welding sequence for distortion control
- Break it up: Apply skip or back-step welding technique instead of continuous passes
- Go fast: Control heat input with proper travel speed and minimal weaving
- Lock it down: Use welding jigs and fixtures for sheet metal to physically restrain movement
- Balance the stress: Weld identical parts back-to-back so forces cancel each other out
These aren't theory—they're battle-tested methods that professionals rely on when precision matters.
Why These Techniques Matter
Understanding sheet metal welding distortion control changes everything about how you approach a project. Instead of fighting warpage after it happens, you'll prevent it from the start. This saves time, reduces material waste, and delivers better results to your customers. Whether you're working on automotive components or custom sheet metal fabrication projects, these strategies apply universally.
Table of Contents
- What Causes Sheet Metal to Distort When You Weld It?
- How Does Strategic Tack Welding Prevent Warping?
- Which Welding Sequence Works Best for Large Panels?
- What Tools and Fixtures Keep Metal Flat During Welding?
- How Can You Fix Distortion After Welding?
What Causes Sheet Metal to Distort When You Weld It?
The Heat Problem Every Welder Faces
When you strike an arc on sheet metal, you're creating a localized blast furnace. The metal around your weld puddle expands rapidly as temperatures soar past 2,500°F. Then, as soon as you move forward, that same area cools and contracts. This expansion-contraction cycle happens in seconds, but the effects last forever.
The Three Factors That Control Distortion
Heat input determines everything. The more heat you pump into thin material, the wider the affected zone becomes. Material thickness plays a huge role too—thin gauge sheet metals warp more easily than thick plate. Finally, weld size matters because larger welds mean more shrinkage force pulling your panels out of alignment.
What Actually Happens Inside the Metal
At the molecular level, welding creates internal stresses that don't simply disappear. The weld metal solidifies while contracting, creating locked-in tension. Meanwhile, the base material around the weld gets compressed during heating, then tries to return to its original shape during cooling. These competing forces fight each other, and your flat panel becomes the battleground. The metal doesn't care about your deadline—it's going to move unless you control these forces from the start.
How Does Strategic Tack Welding Prevent Warping?
Your First Line of Defense
Before you lay a single continuous bead, your setup work determines success or failure. Think of tack welds as the foundation of your entire project. Done wrong, they create stress points that amplify distortion. Done right, they distribute forces evenly and hold everything in place during final welding.
The Center-Out Sequence That Actually Works
Start at the center of your joint and work outward. This tack welding sequence for distortion control allows shrinkage forces to spread naturally toward the edges rather than concentrating in one spot. Place your first tack in the middle, then add tacks progressively toward each end. Space them 2-4 inches apart for most sheet metal work. Additionally, the back-to-back method works brilliantly for identical components—clamp two parts together with weld joints facing opposite directions, then weld both sides. The shrinkage from one side counteracts the other, keeping both parts flat.
Making Tacks That Hold Without Adding Problems
Your tack welds need enough strength to resist the forces of final welding, but not so much heat that they create their own distortion. For most sheet metal applications, tacks should be roughly 1/4 to 1/2 inch long. Use just enough amperage to get good fusion—this isn't the time to show off penetration. Furthermore, check your gap consistency after tacking. If gaps vary along the joint, you'll need more tacks in the wider areas. Remember that proper tacking takes time upfront but saves hours of correction work later.
Which Welding Sequence Works Best for Large Panels?
Why Continuous Welding Creates Disasters
Running a single bead from start to finish on a long seam practically guarantees distortion. As you travel down the joint, heat accumulates ahead of your arc. The metal temperature keeps rising, expansion increases, and by the time you reach the end, you've created a bowed, twisted mess. Long continuous welds on rapid prototyping projects often need complete rework.
Skip Welding and Back-Step: Your Secret Weapons
Skip welding breaks the joint into short segments welded in a planned sequence. Instead of welding 24 inches continuously, you'd weld 2-inch segments with gaps between them, returning later to fill the spaces. This welding procedure for large panels allows each segment to cool before adjacent areas get heated. Meanwhile, the back-step welding technique works similarly but moves backward along the joint. You weld a short segment, then step back and weld the next segment toward your starting point. Both methods prevent the heat buildup that causes major warping.
Parameter Settings and Travel Speed Secrets
Heat input control thin metal welding requires precise technique. Lower your amperage to the minimum that still produces quality fusion—typically 10-15% less than you'd use for thicker material. Then, increase your travel speed proportionally. Move fast enough to keep the heat-affected zone narrow, but not so fast that you lose penetration. Avoid wide weaving motions that spread heat across a larger area. Instead, use a tight stringer bead or slight oscillation. For fillet welds, resist the temptation to overweld. A 3/16-inch fillet doesn't need to be 1/4 inch—that extra metal just adds unnecessary heat and shrinkage force.
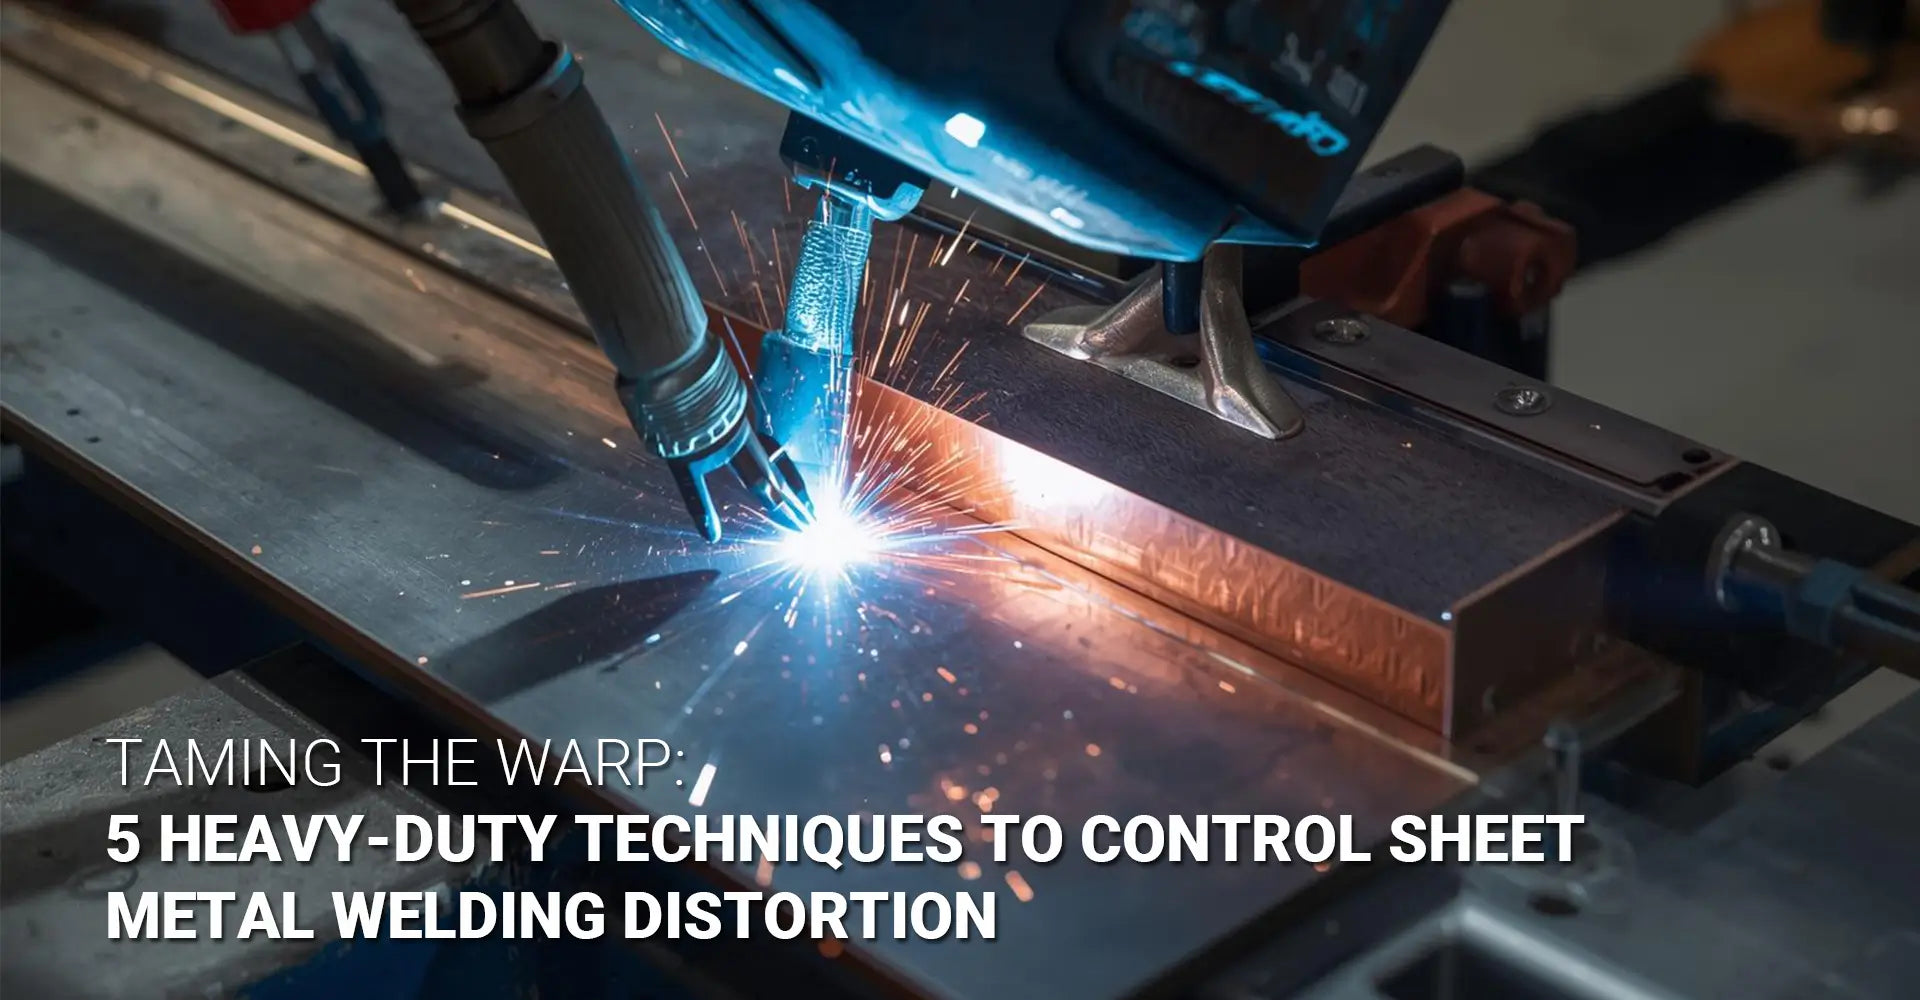
What Tools and Fixtures Keep Metal Flat During Welding?
The Power of Physical Restraint
Sometimes the best technology is a well-placed clamp. When you physically prevent metal from moving during welding, you eliminate half the distortion battle. The key is knowing where and how to apply restraint without creating new problems.
Four Tools That Make the Difference
Welding jigs and fixtures for sheet metal come first—these specialized tools hold parts in precise alignment throughout the welding process. Strong C-clamps and locking pliers work for simpler jobs but require strategic placement. Copper backing bars deserve special mention because they serve double duty. Clamped tightly behind the weld joint, they prevent burn-through on thin material while acting as a massive heat sink that pulls thermal energy away from the weld zone. Finally, temporary stiffeners can save the day on large panels—weld a length of angle iron 3-4 inches away from your seam joint, parallel to it. This prevents the panel from bowing, and you simply cut it off after welding.
Heat Sink Principles and Fixture Design
Copper works as a backing bar because of its exceptional thermal conductivity—it absorbs heat roughly 10 times faster than steel. When you clamp a copper bar behind your weld, it creates a thermal pathway that redirects heat away before it can warp the surrounding metal. For fixture design, think rigidity first. Your fixture must be stronger and more stable than the forces trying to distort your workpiece. Use thick steel construction, and make sure your clamping surfaces are large enough to distribute pressure without creating dents. Position clamps close to the weld joint but not so close that they interfere with your torch access. The right amount of clamping force holds firmly without crushing thin material—hand-tight on locking pliers is usually sufficient.
How Can You Fix Distortion After Welding?
When Prevention Needs Backup
Even with perfect technique, some distortion occasionally slips through. Maybe you inherited a warped part from someone else, or perhaps project requirements changed mid-stream. Either way, you need safe and effective distortion correction methods that fix the problem without creating collateral damage.
Thermal Straightening: Using Heat Strategically
Controlled heating creates localized expansion that, when cooled, produces shrinkage in the opposite direction of your distortion. Heat a small spot (about the size of a quarter) with your torch until it glows dull red, then let it air cool naturally—never quench with water. The cooling contraction pulls the surrounding metal toward that spot. Therefore, you heat the "long" side of a warped panel to shrink it back. This technique requires practice on scrap material first, because heating the wrong areas makes distortion worse.

Mechanical Methods and Safety Considerations
Hydraulic presses and mechanical straightening equipment provide the muscle to bend assemblies back into alignment. However, cold metal resists bending and can crack under excessive force. That's why professionals often combine heat and mechanical force—warm the area slightly (around 400-600°F), then apply gradual pressure. Press slowly and check frequently rather than forcing everything at once. For safety, always wear proper protective equipment when applying heat. Support workpieces securely so they can't shift unexpectedly under pressure. Most importantly, understand that correction work removes distortion symptoms but doesn't eliminate the internal stresses that caused them. Corrected parts may still have residual stress that could cause problems during machining or service. When precision matters absolutely, prevention beats correction every time.
Conclusion
Five Techniques That Guarantee Better Results
Controlling welding distortion isn't magic—it's systematic application of proven methods. Strategic tack welding establishes your foundation by distributing stress evenly from the start. Smart welding sequences like skip and back-step techniques prevent heat buildup along long seams. Proper fixtures and backing bars physically restrain movement while pulling heat away from critical zones. Parameter control minimizes total heat input without sacrificing weld quality. Finally, knowing how to safely correct distortion gives you a backup plan when needed.
Prevention Always Wins
The absolute best time to stop warping is before it starts. Every minute spent planning your welding procedure, setting up fixtures properly, and practicing heat control saves hours of correction work later. Your customers don't care how you achieved a flat panel—they just want parts that fit perfectly on the first try.
Take Action Today
Download your free welding distortion control infographic (link in resources below) for a visual summary of every technique covered here. Keep it near your welding station for quick reference. Then, before starting your next project involving sheet metal, practice these methods on scrap material identical to your actual workpiece. Test different tack sequences, experiment with skip welding patterns, and learn how your specific material responds to various heat inputs.
The Final Word
Mastering distortion control separates good welders from great fabricators. These techniques work across all industries and applications—whether you're building one-off prototypes or production runs of hundreds. Start applying them tomorrow, and watch your warpage problems disappear.
External Resources
[sheet metal welding distortion control][^1]
[Tack welding sequence for distortion control][^2]
[Welding jigs and fixtures for sheet metal][^3]
[Heat input control thin metal welding][^4]
[Distortion correction methods][^5]
[Welding procedure for large panels][^6]
---
[^1]: Explore this resource to learn techniques that minimize distortion during welding, ensuring high-quality results.
[^2]: Understanding the right sequence can significantly reduce distortion in your welding projects.
[^3]: Explore this link to learn how to enhance precision and efficiency in your sheet metal welding projects.
[^4]: Discover techniques to prevent warping and ensure quality welds in thin metal applications.
[^5]: Explore this link to understand various techniques that can effectively minimize distortion during welding, ensuring better quality and precision.
[^6]: This resource will provide detailed insights into the specific procedures and best practices for welding large panels, crucial for successful projects.
